Adapter un patron dans sa hauteur
Les techniques de base pour raccourcir ou rallonger un patron.
Les deux méthodes présentées ci-dessous permettent de réaliser tout un ensemble de modifications, et ce sur n’importe quel type de patron. Vous pourrez alors modifier aisément les pièces composant une jupe, un pantalon ou encore un top.
Dans les 2 cas de figure, la modification à apporter doit être réalisée de façon cohérente afin de pouvoir assembler les nouvelles pièces entres-elles sans difficulté. Ainsi, si le devant est modifié, le dos doit l’être également afin que les lignes de côté correspondent parfaitement. Si la hauteur d’une emmanchure (sur le buste) est modifiée, la tête de manche (sur la manche) doit l’être également.
Méthode A : l’objectif étant de conserver la structure complète du patron
L’ampleur et les volumes du vêtement ne sont pas modifiés.
Couper les pièces du patron en 2 et ajouter ou soustraire la valeur souhaitée entre ces 2 parties.
Point clé : pour plus de facilité, utiliser un papier quadrillé. Les lignes serviront de repère afin de respecter la parallèle et la perpendiculaire.
-
À l’aide d’une règle et d’un critérium, tracer un axe perpendiculaire au droit-fil et aux milieux devant et dos (si les pièces en sont pourvues) sur les parties du patron à modifier. Pour placer la ligne, se référer plus en détail aux explications concernant la modification à effectuer. Mais de manière général, il est conseillé d’éviter de placer le trait sur des lignes de repère, des crans de montage ou encore des pinces.

-
Couper sur le trait de façon à diviser les pièces en 2 parties.

Pour rallonger un patron
-
Coller un morceau de papier sous la partie haute du patron.
-
Reporter la mesure à ajouter sur le papier, en partant de la ligne de coupe de la pièce.
-
Depuis ce nouveau point de repère, tracer un nouvel axe parallèle au trait de coupe.

-
Coller la partie basse du patron sur le papier, en alignant le trait de coupe et l’axe tracé précédemment. Vérifier que toutes les parties sont toujours perpendiculaires au droit-fil et aux milieux devant et dos (si les pièces en sont pourvues)

Pour raccourcir un patron
-
Reporter la mesure à soustraire sur le patron, au-dessus de la ligne de coupe.
-
Depuis ce nouveau point de repère, tracer un axe parallèle au trait de coupe du patron.

-
Coller la partie basse du patron sur la partie haute, en alignant le trait de coupe et l’axe tracé précédemment. Vérifier que toutes les parties sont toujours perpendiculaires au droit-fil et aux milieux devant et dos (si les pièces en sont pourvues).

Pour un patron rallongé ou raccourci
-
Retracer les côtés en ligne droite ou en ligne courbe selon le tracé d’origine du patron.

Vérifier que les lignes d’assemblage entre les différentes pièces correspondent parfaitement et qu’il n’existe aucun décalage.

Méthode B : l’objectif étant de modifier l’ampleur du bas proportionnellement à la modification souhaitée.
Rallonger/raccourcir le bas des patrons dans la continuité du tracé déjà existant.
Cas concrets
Il est préférable d’utiliser cette technique avec parcimonie afin de ne pas modifier l’aisance d’une pièce.Ligne entravée raccourcie
L’ampleur est augmentée sur le bas.
Ligne entravée rallongée
L’ampleur est réduite sur le bas.

Ligne évasée raccourcie
L’ampleur est réduite sur le bas.
Ligne évasée rallongée
L’ampleur est augmentée sur le bas.

Ligne droite raccourcie
L’ampleur reste intacte.
Ligne droite rallongée
L’ampleur reste intacte.

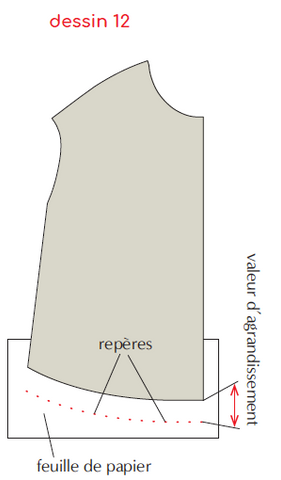
Comment rallonger un patron
-
Dans un premier temps, vérifier qu’il y a assez de papier sous les pièces à modifier afin de ne pas manquer de place.
-
À l’aide d’une règle et d’un critérium, reporter la valeur à ajouter sous la ligne d’ourlet des pièces concernées. Répéter plusieurs fois cette opération à intervalles réguliers.
-
Rejoindre l’ensemble de ces points en traçant une ligne. Pour cela il est conseillé d’utiliser une règle de modéliste appelé « perroquet » afin de tracer les lignes courbes. Cette opération peut aussi se faire à main levée, à condition d’avoir reporté un très grand nombre de repères.
-
Prolonger les lignes des 2 côtés du nouveau tracé, sans modifier leur inclinaison. Vérifier que l’intersection entre les lignes des côtés et celle de l’ourlet forme un angle droit.

-
Vérifier que les lignes d’assemblage entre les différentes pièces correspondent parfaitement et qu’il n’existe aucun décalage.
Comment raccourcir un patron
-
À l’aide d’une règle et d’un critérium, reporter la valeur à soustraire au-dessus de la ligne d’ourlet des pièces concernées. Répéter plusieurs fois cette opération à intervalles réguliers.
-
Rejoindre l’ensemble de ces points en traçant une ligne. Pour cela il est conseillé d’utiliser une règle de modéliste appelé « perroquet » afin de tracer les lignes courbes. Cette opération peut aussi se faire à main levée, à condition d’avoir reporté un très grand nombre de repères.
-
Vérifier que l’intersection entre les lignes des côtés et celle du nouvel ourlet forme un angle droit.

1 commentaire
Bonjour
Les explications sur la méthodologie sont très claires. Merci bcp!
cependant, comment savoir si la hauteur du patron est adaptée à ma stature en l’absence des hauteurs de buste et de jambe fournies dans le patron. Le patron de la robe/combinaison éclipse ne les mentionne pas et je ne sais pas si l’empiècement du buste est adapté…
Cordialement
Catherine